Beautiful wood is just below that ugly painted surface! Our tutorial shows you step by step how to strip shellac or varnish from “reclaimed” wood found at architectural salvage, such as Habitat for Humanity or thrift stores. The process is the same for stripping paint, though paint does take longer.

We found this reclaimed wood at an architectural salvage store. We will be using it to build our bathroom vanity mirrors in our new home. Check back for mirror tutorial in our next YouTube video.

A word of caution: Assume any varnished or painted piece of wood reclaimed from older buildings (especially before 1978) contains lead. Be aware of this health risk and take precautions by wearing gloves and masks. When sanding, you can be exposed to lead or other toxins by inhaling wood dust and fumes or by ingesting lead particles. It is a big concern for small children who tend to get their little hands and mouths into everything.
Striping vs sanding
The solution to preventing ingestion or inhalation of lead particles is to chemically strip the piece of furniture or reclaimed wood and avoid sanding altogether.
It is always better to chemically strip than sand paint or varnish from wood. Stripping varnish or paint isn’t going to be as harmful as sanding – provided you always use protective gear like masks, goggles, and gloves.
You will be exposed to the chemical stripper fumes, so work in a well ventilated area. Wear long sleeves to protect your arms and wear clothing that can be thrown away in case of damage.
Prepare your work area; set up tables or saw-horses, use drop cloths, open windows, keep items off the floor. These practices are recommended to keep harmful chemicals out off reach of children and pets.

If you decide to sand:
Contain dust when sanding. Work outside when possible in a well ventilated area. If working inside; close and tape air ducts. Wear protective gear. Lead dust is heavy and settles onto the floor in a few hours. Make sure to vacuum the floor area and any other spaces where dust can settle in. Remove and dispose of vacuum bag or possible lead debris safely.
Chemical stripping instructions:
We wanted to get straight to raw wood for this project. We selected, used and would recommend Strypeeze Semi-Paste Stripper.

Shake the can well before pouring the liquid into a tray. Do not use plastic containers to hold the stripping agent as chemicals can cause damage and leaks to these containers. Read the manufacture’s instructions regarding containing and or storage of the product you are using.
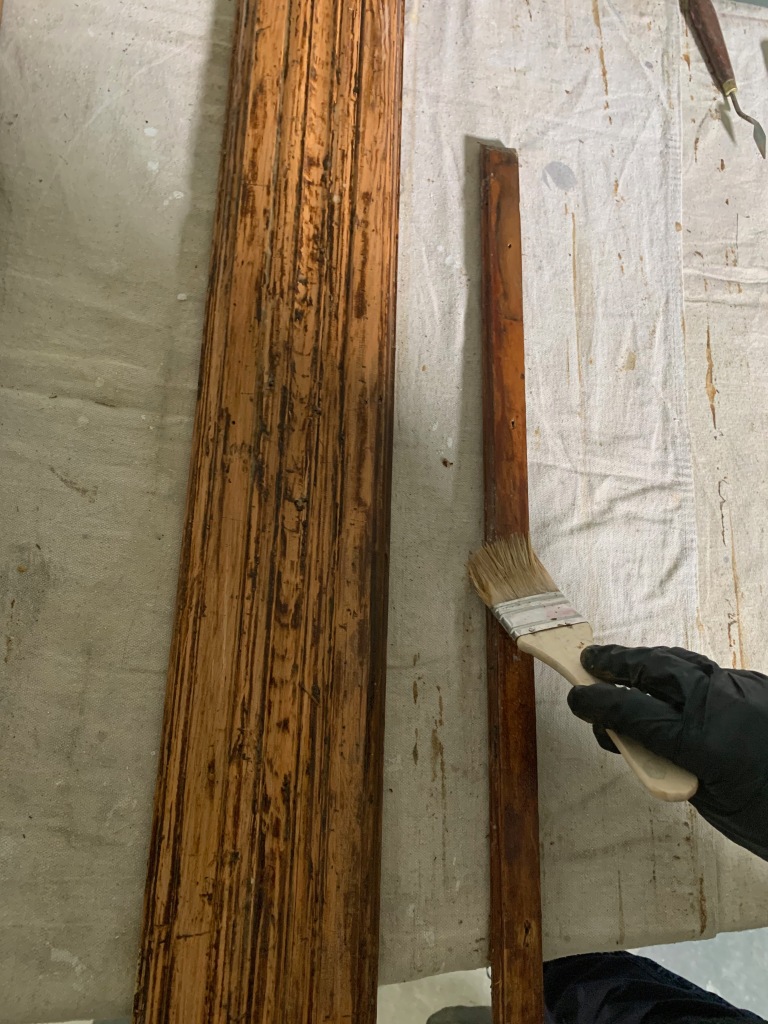
Step # 1
Apply the stripper with an inexpensive, chip paintbrush. Apply the coat with brush in one direction only. Follow the grain of the wood with the application stroke, be generous with the amount of stripping agent you apply. Let the wood absorb the solution for about 15 minutes. Read the manufacturers recommendations.

Step #2
Remove the sludge using a flat spatula or putty knife. In small, narrow spaces found in detailed wood, you can use a small painter’s spatula. Clean the removed goop (paint sludge or residue) from the putty knife on a clean rag as you go. Using a steel wool pad, finish removing any remaining paint or stain residue not lifted with the putty knife. If you are concerned about creating scratches with the metal putty knife, use a plastic spatula.

Another helpful tool for accessing small crevices is the artist’s painting knife shown below.

Step #3
Apply a second coat of chemical stripper and repeat the process until you get to the raw wood.
Using a steel wool pad, rub in one direction to get rid of the paint or varnish sludge.
Step #4
Using a rag, clean the wood with paint or lacquer thinner. This also neutralizes the chemical reaction caused by the stripping agent. Allow to dry.
Step #5
Sand lightly (if needed) to smooth away splinters, wipe off and you are done!
Now that our reclaimed, salvaged wood is stripped, we are ready to build our vanity mirrors. Join us for that upcoming DIY project!
I hope you found this tutorial informative. Please follow us on the blog and our YouTube Channel!
Until next time,
Adios
Materials
Metal tray (not plastic) lacquer thinner eats at the plastic, chip brushes, rags, still wool, putty knifes, lacquer thinner, stripper, cloth to cover table area, masks, gloves, goggles

